
*This post contains affiliate links*
When we first moved in to our house we bought some furniture but didn’t take measurements. We loved the coffee table we originally bought for the living room, but it was just too big since the couch curves at one side, it’s called “the cuddler”. See the photo below to see what I mean.

Then a company reached out and gifted me a set of 3 nesting coffee tables in exchange for some photos of the tables styled, they were really cute and I loved the nesting look!


But we had an incident at a get together where a friend fell on them and broke them. But it was a happy accident because then I got to come up with my own coffee table design and build them myself!
Here’s a quick video of the whole process with a voiceover explaining everything.
I started with a plan on what I wanted them to look like.


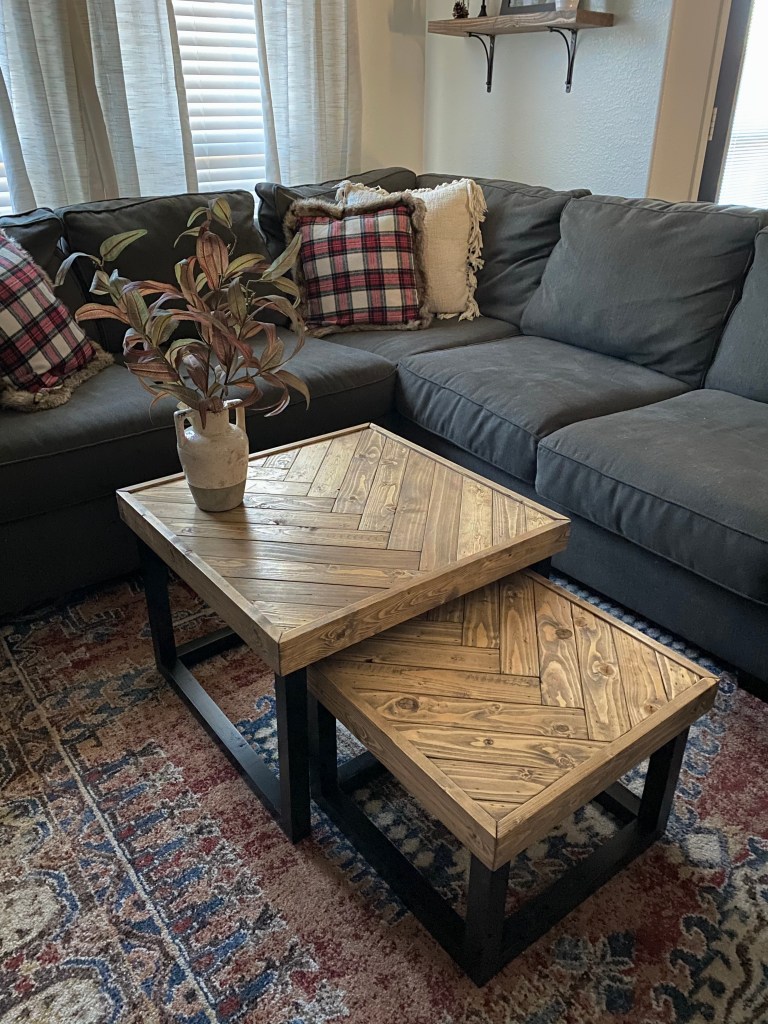
I wanted them to be nesting so we could use them as 2 different tables if we wanted to and the small one could go all the way under the big one if we needed a little more space. I also wanted a fun herringbone pattern on top.
I decided to go with particle board because it’s inexpensive and it wouldn’t be showing. I purchased a 2x4ft piece and cut it in half with my circular saw and a makeshift guide that I clamped onto the particle board. The big table would be about a 2ft square (not including the framed edge) and the small table would be about 1.5ft.

Then I added pocket holes to the particle boards back side to give me a way to attach the boarder of the table in a stronger way than just brad nails. I used this Kreg jig and my drill to make the pocket holes at the time of this project, but if you foresee yourself adding pocket holes to things often, I think it’s worth it to invest in a Kreg Foreman. It makes pocket holes easier and faster! They also have this one that’s very inexpensive, it just takes a lot longer to add pocket holes, but if you don’t plan on using it often, this works just fine.

Once the particle board was cut down to size and the pocket holes were added, I started adding the herringbone pattern using 1×3 common board. I cut them down to size and sanded them with my orbital sander as I went.


I attached the common board to the particle board with Gorilla Glue and my brad nailer.

This is what it looks like once that’s all added.

At this point I flipped it over and used a flat edge again to make it easier to cut a straight line, then I cut the edges off to give each side a straight edge. I was not wearing safety glasses here, but I should have been! Don’t be like me, wear glasses! A mask is a good idea as well so you aren’t breathing in saw dust.


Then I added a 1×3 around the edges with the pocket holes and wood glue. I revealed the frame about 1/4in above the center of the table.


The stain colors I used is Early American by Minwax topped with Weathered Oak by Minwax. It’s a really pretty combination.

I built the small one too and then moved on to the legs. I bought 2x3s for the legs and ripped them down with the table saw to 1.5×1.5in and then sanded them down. I put them together with pocket holes.


This is when the tables really started to look like they were coming together.

I’ve never welded anything but I wanted these legs to look like metal. So I primed them and painted them in Tricorn Black by SW in Satin. You can see I get creative with what I prop my painting projects up on, but you can also buy painting triangles that are very useful.


Before I put it all together I took the table tops outside to put a clear sealer on them. I love the General Finishes High Performance clear coat in flat or satin. I used Satin here.

I attached the legs to the tops by countersinking the screws into the legs with a spade bit that was a little wider than the head of my screw and my go to star head screws. That way you couldn’t see the screw heads poking out from underneath.

Here’s a quick video of the process.
Are you ready to make these nesting coffee tables yourself? If you need more detailed plans you can purchase them here in my Etsy shop. I really love these tables! They are super sturdy too, I won’t lie, I’ve even been known to use them for working out (step ups, bench dips, etc.), so they do hold my weight!


You can find all the links for my living room here.
Next up, my built-in bar. This is a fave project of mine!
Leave a Reply